![]()
Welcome and Introduction
Week 1
Week 2
Week 3
Week 4
Week 5
Week 6
2020 Course Dates
2020 Course Dates
We are excited to start this journey with you
Schedule
Course Start Date: March 9th
Course Schedule:
– Monday’s, 6:45pm – 8:00pm – Classroom & On the floor coaching practice
– Wednesday’s at 12:45pm (changing soon) – Coaches Development
– Weekly Shadow/Assist (schedule will be made together weekly)
Online Learning & Assignments:
– New Modules will be released every Monday
– All assignments are due Sunday
Please refer to the 2020 Course Syllabus for all other details
PCD Coursework
PCD Coursework
Online Learning
Each week PCD students will be responsible for completing the weekly online coursework and homework. All homework assignments will be due by Sunday’s at midnight.
Online Course Curriculum:
1. Course Introduction
2. What it takes to be a LIV Athletic Coach
3. Anatomy
4. Physiology
5. Kinesiology
6. Exercise Programming & Prescription
7. LIV Athletic Coaching Format
8. LIV Athletic Funnel
9. Nutrition 101
10. LIV Athletic Coaching Business Systems
Practical Application
Each week we will spend time on the gym floor practicing and applying the knowledge and education we are learning online and in the classroom.
Week 1 – Core movement patterns
Week 2 – Cool Downs
Week 3 – Whiteboard Coaching
Week 4 – Warmups
Week 5 – Instruction
Week 6 – Correction & Feedback
Assistant Coaching
Each week the PCD students are responsible for assistant coaching one of our veteran coaches. This will prove the students practical application practice in a more controlled setting as well as provide the members with an opportunity to start the trust building process with you as their future coach. Each week, the student will be tasked with a new objective that will build upon the previous week’s application.
Week 1 – Evaluate Sweat
Week 2 – Evaluate Fitness
Week 3 – Sweat: Cool Down
Week 4 – Sweat: Whiteboard + Cool Down
Week 5 – Sweat: Whiteboard + Warmup + Cool Down
Week 6 – Sweat: Full Class
Company Identity
Company Identity
Our Why
Why LIV Athletic
Where We Started
CrossFit Gainesville est. 2008
– 1st CrossFit in Gainesville
– Early Adopter, one of first 500 CrossFit Affiliates
– Opened by Chris & Chip Thorndike
– 1,000 sq. ft. Storage Unit
– One Program
– 15 Members
Where We Are
LIV Athletic est 2015
– Rebranded with a new focus on lifestyle
– Owners: Stephanie & Chris Thorndike
– 5,000 sq. ft. building
– 3 Program Levels: Active, Sweat, Fitness
– 200 Members
Our Impact
Core Values
Coaching Team
The LIV Difference
Core Values
Customer Service
Customer Service
What makes us different?
Quality Standards
Perception is Reality

The harsh reality is that what you think doesn’t really matter. What matters is what the client perceives to be true. It is our job to anticipate a clients needs and service them before they know they are needed.
The article below provides some real life statistics on meeting vs exceeding expectations in the marketplace.
Company Value
Value
Program Value
Unique Selling Points (USP)
Definition: The factor or consideration presented by a seller as the reason that one product or service is different form and better than that of the competition. Click the link below to learn more about how to identify your own USP.
Features vs. Benefits
Features – Facts about products or services; they add credibility and substance to your sales pitch
Benefits – Give customers a reason to buy because they explain how your product or service improves their lives
Features and benefits get easily mixed up and it is important to understand both the features and benefits of your services to best communicate to your customers. Read over the article below to learn how to identify the features and benefits of a service or product.
Assignment 1
Week 1 - Checklist & Resources
Week 1
Check List
✓ Online Learning: Complete the Introduction and week 1 coursework
✓ Onsite: Attend the weekly onsite meeting
✓ Coaches Development: Attend the weekly coaches development meeting
✓ Assistant Coach: Schedule and attend your Sweat Evaluation
✓ Complete Assignment: Complete the week 1 assignments and turn in by Sunday at midnight.
Tools & Resources
The Skeletal System
The Skeletal System
The Spine
The Muscular System
The Muscular System
The Endocrine System
The Endocrine System
Endocrine System & Exercise
Endocrine System Part 1
Endocrine System Part 2
The Nervous System
The Nervous System
Nervous System Part 1
Nervous System Part 2
The Nervous System & Exercise
1. The Nervous System initiates movement
Movement can come from us voluntarily or involuntarily depending on the circumstance.
2. Nervous System Training
As coaches, we have to understand the CNS and how we can influence training adaptations in it before we can expect training adaptations in the muscle or movement desired.
For Example: Someone who is struggling to initiate power or the speed to get under the barbell on a clean may have poor communication between the PNS and the CNS and therefore need skill specific training to reinforce the neural pathways instead of and/or before the muscular training.
Assignment 2
Week 2 - Checklist & Resources
Week 2
Check List
✓ Online Learning: Complete the Introduction and week 1 coursework
✓ Onsite: Attend the weekly onsite meeting
✓ Coaches Development: Attend the weekly coaches development meeting
✓ Assistant Coach: Schedule and coach the Cool Down in a Sweat Class
✓ Complete Assignment: Complete the week 2 assignments and turn in by Sunday at midnight.
Tools & Resources
POGO
POGO
Be a bee…
POGO begins 15 minutes before the class start time
Personal
Organization
Goals
Obstacles
Coaches are expected to get to know the athletes on a personal and professional level. This acronym represents talking points to help assist in conversation starters prior to the start of class. When using the acronym, try to ask open ended questions. It will help create a conversation versus an inquisition.
At the start of class, during the class Introduction the coach will begin with a question of the day. This is a great opportunity to set the mood of the class, get people engaged, and introduce any newcomers into the group.
Create a Movement
Although this video is silly it demonstrates some powerful messages about leadership and what it takes to get others involved. During POGO you are trying to engage the community, get people talking, and help foster relationship building. What you are also doing inadvertently is teaching everyone how we treat others in the gym.
When you are friendly, talk to everyone, recognize when a new person is in the room, introduce them to everyone and make sure everyone is chatting, you are setting the tone of who we are at LIV and how we do things. This is a crucial part of our community because you cannot be everywhere all of the time so our members pick up on this and help foster the welcomeness that we would.
If you are not a natural conversationalist this will be one of the more challenging parts of your coaching hour. Use the POGO acronym to give you ideas on what to talk about. Some people are going to be harder to crack than others. It may seem insignificant, but intentional POGO is something that sets us apart from other gyms. No one in our gym is just a member, everyone is a friend, athlete, mom, dad, sister, brother, etc.
Think about how you frame your questions to begin a conversation. Try to ask open ended questions like What’s New? instead of What’s up?
How To Be A Better Conversationalist
What makes us different from other gyms, coaching programs, and communities is how much we invest in our members. We truly care and treat everyone like family. To do that, we have to get to know every single person. This will take time, but will also be one of the most rewarding parts of being a coach. The more we know someone, the more we can relate, have empathy, and communicate in a language that is receptive to that person. Give some of these tips and tricks a try!
Whiteboard Coaching
Whiteboard Coaching
Less is more
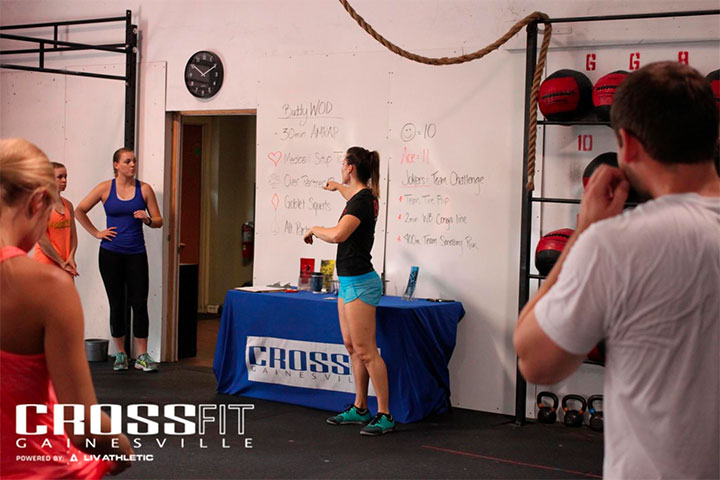
Whiteboard Coaching
The BIG Picture:
1. Ice Breaker and class introduction – the coaches opportunity to make sure everyone in class knows each other. During the question of the day it switches the focus from chatting to listening in a fun way.
2. Establish Control – it is important to have the attention of your class at all times. The whiteboard is the first time during the class to take control and showcase your leadership for the remaining hour.
3. Overview – Less is more when it comes to the whiteboard coaching. Everyone in class can read so it is important that you bring something educational to the table.
4. Intention & Expectations – This is the time to relay what the intention of the workout is. Are they supposed to try to do everything unbroken or find a consistent pace? You will also help identify what they should expect. This part is challenging as every class will have a variety of fitness levels.
Intent
1. Workout Intensity
2. Movement Modification
3. Workout Goal
4. Weight Goals/Modifications
5. Mindset
You are successful in whiteboard coaching when the athlete understands the “why” behind their training, how to scale/modify the workout appropriately, is “Primed” for the workout to come, and can see the value in what they are doing.
Example
Here is an example of what would be mentioned verbatim in the whiteboard section of coaching:
21-15-9
Burpee
Wallball
Pull-up
Today’s workout is a fun one! 🙂
The format is 21-15-9 meaning you will do 21 of each movement, then 15 of each, then 9 of each.
This workout is intended to be a quick burner so the focus should be on speed rather than strength.
How long do you think this should take?
Yeah, this should take around 8-12 minutes.
The wallball weight should be something you can do either unbroken or in two sets each round.
For the pull-ups, if you can consistently connect 5 or more you will be doing pull-ups today, otherwise you will do jumping chest to bar pull-ups or jumping chin over bar pull-ups.
This one is going to burn. I don’t say that to scare you. I want to prepare you for what is to come so you are not surprised by it. When it starts to burn today I want you to give yourself a quick assessment each rep and ask yourself, “can I do one more rep?”
Any questions?
Recap
1. Know your audience and adjust accordingly (Sweat v Health v Performance)
2. Observe your audience and adjust accordingly (Distractions, loss of interest)
3. Be clear and concise, avoid repeating yourself
4. Avoid using negatives (Positive reframing)
5. Avoid repetitive filler language (Um, Cool, Alright, etc.)
6. Save specific instruction and strategy for during instruction portion
The goal is to dive deeper into the programming to help them understand how to talk the workout, what the expectations are, how it should feel, and what is the time domain.
Asking questions during the whiteboard coaching is a great tool to keep everyone engaged and focused on what you are saying. It also allows participation and gives the coach a better idea of what the athletes perceive of the workout.
Understanding the programming is in a future chapter but will help tremendously in this part of your class.
Warmups
Warmups
The mind and body connection
The importance of a warmup
1. Raise body temperature
2. Expose athletes to movements similar to the movements in the workout
3. Prepare muscles what will be used in movements of workout
3 Phases of a Warmup
1. General – Goal is to raise body temperature. By raising the core body temp is circulates blood flow and preps joints, ligaments, and tendons for movement.
2. Dynamic – These movements are preparatory movements utilized to prep specific muscles or muscle groups for the specific movements in a workout.
3. Specific – These should mimic similar movement patterns in the coming workout, or be segments of movements to come.
Sample Workout
A1. Back Squat
5 sets, 5 reps @ 80% 1RM
B1. Pull-ups
3 sets, 10 reps
B2. Shoulder Press
3 sets, 5 reps
C. 15 Min AMRAP
10 Burpees
20 Lunges
10 Toes to Bar
20 Box Jumps
Example Workout
General Warmup:
200m OH Plate carry
200m Run
Dynamic Warmup:
10 Banded Good Mornings
10 Stationary Lunges + Banded Pull Aparts
20 Monster Walks/side
30 sec Handstand Hold
Specific Warmup:
10 Scap retracts
5 Pull-up negatives – 3 sec
10 BB Strict press
10 BB Tempo Squats at 32×1
Flow & Format
Instruct class to grab a plate.
General Warmup (3 minutes)
200m OH Plate carry
200m Run
Upon return of the run, have them put the plate away and grab a band. To minimize transition time you can consider grabbing the bands and either laying them out on the floor where you want them to stand of hand them to them when they get in the door.
Dynamic Warmup (5 minutes)
10 Banded Good Mornings
10 Stationary Lunges + Banded Pull Aparts
20 Monster Walks/side
30 sec Handstand Hold
Before you have the class set up the rack for the Press and Back Squat. Have them to the scap retract and pullup negative portion of the Specific warmup. Upon completion instruct them to grab a buddy, a barbell, and set up for their back squat.
Specific Warmup (6 minutes – including transition)
10 Scap retracts
5 Pull-up negatives – 3 sec
10 BB Strict press
10 BB Tempo Squats at 32×1
If everything goes smoothly, the entire warmup will take 14 minutes to complete. Keeping track of your warmup timing and flow is very important to setting yourself up for success for the rest of the hour.
It is very easy to lose control of the class during the transitions. Continually give them direction. For example, after telling everyone to grab a barbell, set up their rack, and grab any other equipment they need, I suggest giving them a time frame to do it. Or you can help a team get set up quickly and then start directing everyone to Yas & Stef’s bar.
Even if everyone else is not done setting up. Seeing that one person is and the coach has instructed everyone to meet at the bar helps people not get lost in conversation and stay on task.
Creating an Effective Warmup
1. This is your chance to be the programmer
Have fun with designing your warmups by incorporating the following:
Validity: Logically sound/ facts
- Perform research
- Know scientific rationale
- Apply
Goals: Have expectations for each progressions that provide desired end result – stronger core, better squat flexibility/mobility, etc…
Progressions: Have certain exercises planned that can be further progressed with little to no more time.
- Examples:
- Plank → plank w/hip flexion
- Facepulls → facepulls w/ holds
2. Understand the demographics of your class – Profession, Tendencies, Training level
Most of the people we work with will have similarities in workplace, activity, behaviors, movement tendencies, and training level. We must consider these factors and plan accordingly, to better suit each movement or workout to the individual.
Example: The class may be filled with people with desk jobs, so it is our job to help combat the poor posture and prep them for the workout by opening up their hips and chest.

3. Understand common human movement – Errors, Faulty movement, Imbalances in the general population and individuals in class . It is our job to understand and identify common faulty movement. Your knowledge is only as good as the amount of people you help.
Practice: You should constantly be analyzing human movement, aiming to understanding what is going on and how to optimize current motor patterns.
Application: By understanding common human movement tendencies you can better plan a warmup that addresses the most common muscle imbalances, weakness, and unruly movements.

4. Transferability of movement selection.
5. Every warmup should address the 3 R’s
Recruit, ROM, Refer 6. Get them out of their comfort Zone
Recruit: Turn on the muscle fiber type, energy system, low toned muscles
ROM (Range of Motion): Address commonly taut/tight muscles while working in the range of motion needed for the ensuing movements of the workout.
Refer: Integrate the body into movement that transfers to the movements in the workout. May have to do more than once.
6. Get them out of their comfort zone
Most of the workouts that are provided can keep athletes in their comfort zone, especially if they are an advanced athlete. The warmup is a great place to instill some mental fortitude by challenging athletes to perform difficult yet easy to grasp exercises that strengthen not only the body but the mind. This will assist in training improvement by priming the mind to withstand the adversity or toughness of getting through a challenging workout thus allowing more physical adaptations.
For Example: Bird dog with only knee and hand touching the floor.
Recap
1. Opportunity to increase energy
2. Opportunity to challenge athletes
3. Opportunity to create teaching moments
4. Opportunity to set yourself up for success
5. Opportunity to keep athletes safe and healthy
6. Opportunity for the coach to be creative and try new things
Warmup Movement Selection
Warmups
Movement Selection
Starter Kit
✓ Lower Body
✓ Deadlift Prep
✓ Ankles/Feet
✓ Shoulders
✓ Low Back
Instruction & Progression
Instruction & Progressions
The main event
Instruction
1. Keep it simple
2. Know the main points of performance
3. Coach to the light
4. Understand common faults
5. Understand common struggles
6. Understand varying levels of ability
The instruction portion of the class is your time to shine.
Progressions / Modifications
1. Understand how to simplify a movement
2. Understand how to advance a movement
3. Understand how to replicate intended stimulus of a movement
Modification Library
Again Faster Movement Library
Catalyst Barbell
When & How to Spot
Correction & Feedback
Correction & Feedback
Less is more
Cueing
Build your toolbox have as many cues for each movement as you can. Everybody learns differently so it is important to be able to communicate in a variety of modalities.
Verbal
- Simple and to the point.
- Focuses on a particular point of performance
Visual
- Show them what the right way looks like
- Show them what they are currently doing
Tactile
- Physically guide the athlete through the correct movement
- More applicable for some movements than others
- Make sure athlete is comfortable with contact
- Ask permission to touch before going in (use barbie hands)
People Skills
This is where the magic happens!
Perception is everything. Make sure your tone/demeanor/body language are welcoming and being perceived positively by the athlete.
Watch for and respond to social cues
- What are some common cues?
- PCP Praise/Correct/Praise – Layer the corrections or constructive criticism with positive feedback before and after
- Coach to the Light – Choose positive phrasing and terminology when explaining or demoing a movement Avoiding False Praising
Know your athletes and know how to respond to their needs. There are many types of athletes and one athlete may go through different phases depending on their day, mood, or athletic maturity.
-
The “Un-Coachable” Athlete – The know it alls. Those that do not like receiving critiques. This athlete could also be someone who is too preoccupied with their time, competing with others, or the end game instead of safety or form.
The “Uncoordinated” Athlete – This is someone who most likely did not participate in any sports or athletics in their past and are starting their athletic journey now. They usually have a great attitude and really try, but struggle to catch on as quickly as the rest of the class.
The “Overwhelmed” Athlete – Sometimes you will find this kind of athlete has a negative mindset. They feel like everything is too hard, too many reps, too complicated. They also usually undervalue their abilities and struggle to challenge themselves.
The “Underwhelmed” Athlete – These athletes have no fear and feel like they are capable of everything. They tend to go out of the gate guns blazing and want to add load even if the workout does not prescribe or form is poor.
The “New and afraid” Athlete – This athlete is just plain nervous. Everything is new – the people, the equipment, the format, the music, the scoring, everything.
The “New and Overconfident” Athlete – These athletes are overly confident in their abilities and haven’t proven their capabilities to a coach to allow for proper guidance and feedback. Sometimes they are hard to give feedback to because they didn’t “do it that way” previously. It takes some time to earn their trust and remind them that they are here to learn new things.
Faults & Fixes
Every movement you will teach has standards that make the movement safe and effective. When the movement being performed is not in accordance with the movement standards there are a bunch of ways to assist the athlete with a correction. There are some standard fixes, but you will accumulate what works for you as you develop as a coach.
CrossFit’s 9 Fundamental Movements Faults & Fixes – PAGE 106
Olympic Lifting Faults & Fixes
Cool Down & Stretch
Cool Down & Stretch
Recovery Phase

The Cool Down portion of the workout is one of the hardest due to the time constraints, but one of the most important. Here are some reasons to make sure the athletes make the recovery phase of training a priority.
1. Nervous System – Going for a cool down walk, doing the bretzel, or doing some breathing work post workout is a great way to allow the nervous system to slow down.
2. Safety – This is the time to check in with your athletes to make sure they are feeling healthy post workout. Some workouts are more brutal than others and hoping in a car before they are properly recovered is dangerous. Make sure you take inventory of your athletes before they leave the facility.
3. Recovery – Each workout targets different body parts, and providing guidance on how to manage the soft tissues post workout will help minimize injury and soreness.
Week 3 - Checklist & Resources
Week 3
Check List
✓ Online Learning: Complete the Introduction and week 1 coursework
✓ Onsite: Attend the weekly onsite meeting
✓ Coaches Development: Attend the weekly coaches development meeting
✓ Assistant Coach: Schedule and attend your Fitness Evaluation
✓ Complete Assignment: Complete the week 2 assignments and turn in by Sunday at midnight.
Tools & Resources
1. Muscular System
2. Muscular System – Laymens Terms
3. Oxygen to Muscle System
4. Skeletal System
Psychology
Psychology
The Coach / Athlete Relationship
The best coaches are invested in their athletes and take the time to get to know how they tick. We may not be training Olympians daily, but the coaching quality should be the same. Think about how good it feels to have a successful day at the gym. Maybe you PR’ed or one the high skill movements finally felt effortless. Walking away with those feelings are powerful.
By understanding each athlete on an individual level you will help develop their performance at their own rate as well as keep them in a healthy state of mind about their training and progress, and hopefully keep them wanting to come back for more!
As you develop your coaching toolbox you will be able to coach group classes with an individual touch if you really focus on the relationship building part of coaching.

Class Format & Timing
Class Format & Time
3, 2, 1, GO…

Class Format
P.O.G.O. – This stands for Personal, Organization, Goals, and Obstacles. Coaches are expected to get to know the athletes on a personal and professional level. This acronym represents talking points to help assist in conversation starters prior to the start of class.
Class Introduction – Coach begins the class with the question of the day and introduces any newcomers.
“Whiteboard” coaching & workout goal overview – Coach then effectively communicates workouts – intended time domains, % effort, reps/tempo/rest, and focus for athletes around whiteboard.
Effective Warm-up – Coach understands the movements of the day and creates an effective warm up prepping the body for the upcoming movements, loads, and intensity. Coach follows the warm-up template: increase body temperature, stretching & increase ROM, increase cardio-respiratory rate using whole body movements, then movement specific prep.
Instruction & Progressions: Coach is able to effectively break down and instruct any movement within the workout into manageable chunks as well as explain the progressions for any given movement.
Corrections & Feedback – The coach moves through the room to show attention to each athlete as well as shares personal feedback for corrections in technique. Throughout the class, the athlete receives both validation of progress and needed improvement.
Cool Down/Stretch – Coach leads athletes through a targeted cool down stretch and recovery routine that targets muscle groups used in the workout.
Announcements – Events, Challenges, Pro-Shop Items. Coach will share 1 feature with the group and explain why LIV Athletic recommends the event, challenge, item, etc. Coach will follow up with encouragement and further questions to promote enrollment.
Timing
5:30pm Class
5:20pm – POGO
5:30pm – Whiteboard Coaching
5:35pm – Begin Warmup
5:50pm – Begin Part A (15 minutes)
6:10pm – Begin Part B (15 minutes)
6:25pm – Clean up, Cool Down / Stretch, and Announcements
6:30pm – High 5’s and finish class
The work time for every workout is programmed to be 30 minutes or less. That means the coach has 30 minutes for introductions, transitions, warmup, instruction, and cool down. That is a lot to fit into 1 hour so it is very important to keep watch on the clock.
Safety
Safety
Thinking Ahead

Imagine you have a class of 15 athletes and the workout calls for pullups, barbell work, and wallballs. Without the right setup with safety in mind, this could easily create a bad situation, and fast.
There are three factors that must get considered every class when deciding how to set up the class flow:
1. Coach’s safety
Don’t forget about yourself when planning a workout. When considering the layout of a workout, make sure you leave room for you to walk the room to coach in a safe manner. On days with KB Swings, Double Unders, etc this can be extra challenging to find room for the movement and your safe path from athlete to athlete.
2. Athlete safety
Athlete safety is what is going on in there own personal space. For example, a workout with a barbell, pull-ups, and wall balls would need to consider the following:
Are there any plates on the floor by their bar that they can drop the bar on?
Are the wall balls placed far enough away from the pull-up bar that doesn’t interfere with pull-ups?
Are the wallballs far enough away from the barbells?
3. Transitional Room:
To accomplish this you not only have to have an organizational plan, but you have to educate the athlete on where you want them to stand, face, transition, etc. It is not enough to have everyone put their KB’s in one lane if they are all swinging the KB facing a different direction.
Planning For Success
When considering the safety, format, and flow of a class, always assume you will have 20 people in class. That way you are set up for success if you have less than that. That means a lot of the time you have to set up a workout with the intent that athletes will share equipment. The more equipment on the floor, the higher the opportunity for issues.
Here is how you might set up a workout with some of the more challenging equipment pieces:
5 Rounds for Time:
5 Pull-ups
10 Box Jumps
20 KB Swings
30 Double Unders
400m Run

Time Management
Time Management
Successful Habits

Make the most out of your coaching hour by being prepared and keeping control of your class flow. Here are some strategies for success:
1. Plan
Use our Lesson Planner to set yourself up for success. Planning ahead will allow you to create a well rounded class while making time edits before you are on the floor.
Example lesson plan:
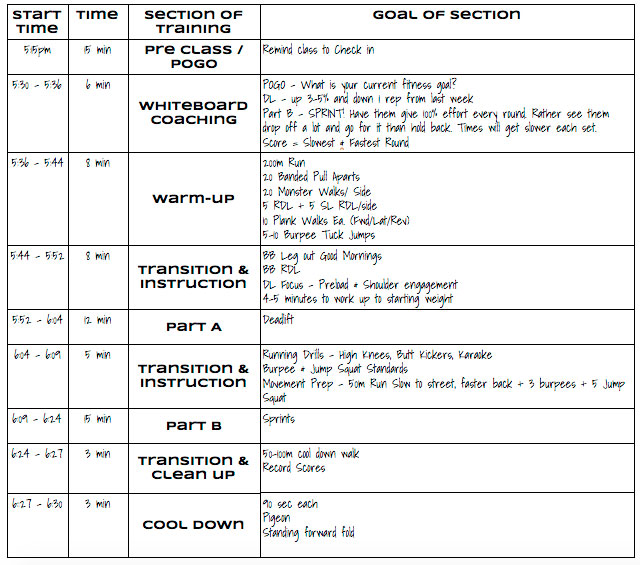
2. Streamline
It is important to make the most out of every second of your class. You can do that through using complex movements like lunging banded pull-aparts, sots presses, or creative lunge + hinge + pushing movement to minimize the time it takes to complete the movement while maximizing the number of muscular systems that get utilized at one time. Another is through your use of equipment, minimizing transition time, and choosing a focus of the workout instead of trying to teach every detail.
Streamlining not only helps you stay on task, but complex movements challenge athletes both mentally and physically before the start of a workout and choosing a focus of the day allows you to really teach the athletes something new.
3. Adapt
A plan is a blueprint that should be easily adaptable. There are so many wrenches that will get thrown into your plan and you have to be able to adapt and roll with the punches. By completing the Lesson Planner before classes, it will give you a much better idea of what time you have to work with. For example, say you planned a whole warmup and one of your movements ends up taking the class so much longer to complete than you originally planned. You only have 2 minutes till you need to move onto the next phase of the class, and you planned another 2-3 warm up drills.
You have a few options, but need to take an assessment of of class first to triage the situation. Questions to ask yourself:
1. What is more important for the workout ahead? The remaining 2-3 warm up drills or is there another place to make up time? (If you filled out the Lesson Planner you should have a good idea of how tight you are on time)
2. If there is no wiggle room in the rest of the class time, you will have to either choose the drill that has the most impact or think of something on the fly to complete the intended need. Meaning if the remaining two drills were KB Swings and KB Front Squats to generate some dynamic movement from the hips and prep the body for load. You can have them do some burpee tuck jumps or jumping kb squats to target the same intent but save some time.
The Art of Coaching
The Art of Coaching
Is Coaching an Art or Science?
Science
To support the coach there is a wealth of scientific information based on research conducted with athletes. Information is available to support the coach and athlete in all areas of training and development including nutrition, biomechanics, psychology, physiology & medicine. There are a number of scientific methods to measure and analyse the athlete’s performance e.g. computer aided analysis of VO2 max, lactate levels, running technique etc.
Art
The art of coaching comes when the coach has to analyse the scientific data and convert it into coaching and training programs to help develop the athlete. This analysis process relies heavily on the coach’s experience and knowledge of the event/sport and the athlete concerned. By understanding the science, which is the foundation of training, a well designed training program can be developed that will help an athlete reach their full potential. So is coaching the art of understanding the science and then applying it?
The Coaching Process
The coaching process comprises of three elements:
1. Planning
Developing short and long term training programs to help your athlete achieve their goals. The programming team at LIV is responsible for this process, but it is expected that every coach understands and can implement the plan.
2. Conducting
Delivery of training programs. This is the primary job of assistant coaches.
3. Evaluating
Evaluation of the programs, athlete development and your coaching. This element may result in adjustment of your athlete’s training program and your coaching. This is an ongoing process that should be done daily by yourself as a coach, and quarterly by the director of your program to give some outside feedback.
To support this process you will need to develop your knowledge and practical coaching skills. These include, but not limited to:
Your coaching philosophy
- Coaching Style
- Teaching Methods
- The learning process and training principles
- Legal responsibilities
- How to apply an athlete centred approach to your coaching
- Prepare training programs to meet the needs of each athlete
- Long term athlete development
- The rules for your sport/event
- How to assess your coaching performance
- How to communicate effectively with your athletes
- Advise athletes on issues of safety applicable to their sport/event
- The causes and symptoms of over-training
- How to reduce the risk of injury to your athletes
- Assist athletes to develop new skills
- The biomechanical process that underpin efficient action
- Use evaluation tests to monitor training progress and predict performance
- Advise athletes on their nutritional needs
- Advise athletes on supplementation
- How to develop the athlete’s energy systems
- Advise athletes on visualization and mental imagery skills
- Advise athletes how to prepare for competition
- Evaluate an athlete’s competition performance
- Provide clear and effective instructions, explanations, and demonstrations
- Conduct effective observation and analysis
- Provide clear and effective feedback
- Use effective questioning to determine what an athlete knows or can do, their understanding and to develop their self awareness
Energy Systems
Muscle Types
Muscle tissue has four main properties:
1. Excitability – ability to respond to stimuli
2. Contractability – ability to contract
3. Extensibility – ability to be stretched without tearing
4. Elasticity – ability to return to its normal shape
Based on certain structural and functional characteristics, muscle tissue is classified into three types:
1. Cardiac
2. Smooth
3. Skeletal.
Learn about muscle types and their functions below
Energy Systems
There are 3 energy systems that fuel the body:
1. Phosphagen – short sprints lasting 5-15 seconds
2. Glycolysis – fast intervals of 30 seconds or 2 minutes (1:2 work:rest)
3. Aerobic – Continuous or interval training longer than 2 minutes
Read up on the different systems and how the function below
VO2 Max
VO2 Max is the measurement of the maximum amount of oxygen that an individual can utilize during intense, or maximal exercise. It is measured as milliliters of oxygen used in one minute per kilogram of body weight.
An athlete’s VO2 Max score is generally considered by exercise physiologists as one of the best indicators of the athlete’s cardiovascular fitness and aerobic endurance. Theoretically, the more oxygen you can use during high-level exercise, the more ATP (energy) you can produce. This is often the case with elite endurance athletes who typically have very high VO2 max values.
Learn more on how to improve your VO2 Max read below
Heart Rate Zones
A well rounded program includes a variety of training zones. Each zone is responsible for a specific outcome – recovery, lactic acid training, endurance training, fast twitch or speed training, etc. . .
The different training zones will be explained in more detail when we talk about programming.
Read up on the different zones and their training adaptation below
The Movements
Movements
The following sections are all part of the CrossFit Level 1 Handbook. Become familiar with the primary points of performance for each movement.
1. CrossFit Methodology . . . . . . . . . . . . . . . . . . . . . . . . . . . . . . pgs. 1 – 33
2. Squat . . . . . . . . . . . . . . . . . . . . . . . . . . . . . . . . . . . . . . . . . . . . pgs. 68 – 81
3. Overhead Movements . . . . . . . . . . . . . . . . . . . . . . . . . . . . . pgs. 82 – 85
4. Deadlift . . . . . . . . . . . . . . . . . . . . . . . . . . . . . . . . . . . . . . . . . . pgs. 86 – 90
5. Medball Clean . . . . . . . . . . . . . . . . . . . . . . . . . . . . . . . . . . . . pgs. 91 – 95
6. 9 Fundamental Movements Points of Performance . . . . pgs. 105 – 114
Olympic Lifting
Olympic Lifting or Weightlifting the sport is composed of 2 movements, the clean & jerk and the snatch. They are also common barbell movements seen in crossfit. Familiarize yourself with the primary points of performance for the Clean & Jerk and the Snatch below.
Assignments
Assignments
Please complete each assignment to the best of your ability to showcase your understanding of each topic.
The Process
1. Create a google drive folder for all of your PCD Assignments and share with [email protected].
2. Label your folder – First Name Last Name PCD (Ex: Stephanie McCarthy PCD)
3. Create new document for each assignment and keep in your PCD Folder.
4. Upon completion of each assignment share or comment on your doc to notify me that it is complete.
Please email [email protected] if you have any questions.
Assignment #6
Answer the following questions as detailed as possible.
1. What is the importance to training in understanding the different muscle types?
2. Give 2 examples of each energy system as seen in crossfit.
Assignment #7
Take one of the evaluations you have already completed and answer the following questions in relation to the workout of the day.
1. Write the workout of the day you will be referring to for the following questions.
2. Anatomy & Physiology: Pick a movement from the workout and list the prime movers of that movement.
3. Energy Systems: What are the energy systems required of the workout for each part?
Assignment #8
Choose 3 of the 9 Fundamental Movements and video yourself coaching to the video as if it is your class by using the points of performance for each.
Upload your videos to youtube, vimeo, etc. . .
I highly suggest doing this with a friend or classmate to help with the videography. It does not have to be perfect. The point of the exercise is repetition of verbalizing and explaining how to do a movement.
Practicals
Practicals
You are responsible for completing a minimum of 9 practical evaluations throughout the course. To get the best understanding of the various coaching styles and different program vibes, we want you to evaluate the following classes and class times. These can be done in any order throughout the 9 weeks.
1. 5:30am Performance Class wth Chris (Monday or Wednesday)
2. 10:00am Health Class
3. 12:00pm Performance Class
4. 4:15pm Active Class
5. 4:30pm Health Class
6. 5:30pm Sweat Class
7. 5:30pm Health Class
8. 5:30pm Sweat Class
9. 9:00am Saturday Health & Performance Class
On top of evaluating most of our class times, make sure you get a chance to coach every coach to see how the same thing can get coached and communicated a variety of ways.
Overview
Overview
The big picture
When programming and coaching it is important to have an understanding of the following training domains, body systems, and training formats.
Periodization
Is the systematic planning of athletic or physical training. The aim is to reach the best possible performance in the most important competition of the year. It involves progressive cycling of various aspects of a training program during a specific period.
Lactate
Lactate is a naturally occurring organic compound produced in everyone’s body and is both a byproduct of and a fuel for exercise. It is found in the muscles, the blood and various organs. Your body needs it to function properly. A term that is often associated with lactate is lactic acid. They are very close chemically. We use the term “lactate” even though in many places “lactic acid” might be technically right. The use of lactate instead of lactic acid should not interfere with any interpretation. The chemical formula of lactate is C3H5O3. The primary source of lactate is the breakdown of a carbohydrate called glycogen.
Absolute Strength
The maximum force that an individual’s muscle can produce is a single voluntary effort, regardless of the rate of force production or size
Aerobic
Aerobic comes from a Greek word meaning air. It is used here to refer to aerobic energy which means energy produced with oxygen. We have one aerobic system as opposed to two anaerobic systems.
Aerobic Capacity
Aerobic Capacity is the maximum amount of energy that can be produced by the aerobic energy system during physical activity. It is also called VO2 max. It is constantly changing as an athlete goes through the training cycle. It is thought that each individual has an innate maximum that is genetically determined.
Aerobic Power
Aerobic Power is the percentage of Aerobic Capacity that can be used during an athletic event. Various metabolic factors prevent an athlete from using 100% of aerobic capacity for the entire event. For long events aerobic power is the same as lactate threshold or maximum lactate steady state. Aerobic power is directly affected by anaerobic capacity. The higher the aerobic capacity is, the higher aerobic power will be. The higher the anaerobic capacity is, the lower aerobic power will be.
Anaerobic
Anaerobic means without oxygen. It is used here to refer to anaerobic energy which means energy produced without oxygen. We have two anaerobic systems as opposed to one aerobic system. The two systems are the Creatine Phosphate system and the Glycolytic system.
Anaerobic Capacity
Anaerobic Capacity is the maximum rate of energy that can be produced by the anaerobic energy system during highly intense physical activity. It is frequently called VLamax. It can change as athlete goes through the training cycle. It is thought that each individual has an innate maximum that is genetically determined. However, some coaches and sports scientists have observed growth in this capacity with years of training. This term has many other meanings and the definition we have provided is not accepted by many in the academic literature. Anaerobic Capacity is frequently used to refer to the amount of anaerobic energy that is released during maximum activity as opposed to highest possible rate of energy release.
Anaerobic Power
Anaerobic Power is the percentage of Anaerobic Capacity that can be used during an athletic event. Various metabolic factors prevent an athlete from using 100% of Anaerobic Capacity for the entire event. For very short events Anaerobic Power will be very close to Anaerobic Capacity. Anaerobic Power is directly affected by Aerobic Capacity, Anaerobic Capacity, buffering and Lactate tolerance. The higher the Aerobic Capacity the higher Anaerobic Power will be, as the aerobic system eliminates the lactate produced.
Anaerobic Threshold
Anaerobic Threshold has many meanings – but here we use it to mean the maximum efort that can be sustained for an extended period without Lactate steadily accumulating. We prefer the term Lactate Threshold or Maximum Lactate Steady State instead.
Autonomic Nervous System
ANS is part of the peripheral nervous system that acts as a control system functioning largely below the level of consciousness, and controls visceral functions. Some functions that the ANS controls are heart rate, respiration rate, salivation, perspiration, and diameter of pupils.
Central Nervous System
Central Nervous System: The central nervous system (CNS) is the part of the nervous system that integrates the information that it receives from, and coordinates the activity of, all parts of the bodies of bilaterian animals. This includes the brain and spinal cord.
Eccentric Contraction
A contraction where the muscle elongates while under tension due to an opposing force being greater than the force generated by the muscle. Ex. the lowering portion of a squat.
Isokinetic Contraction
An isokinetic muscle contraction is one in which the muscle contracts and shortens at constant rate of speed. This type of muscle contraction usually requires special, expensive training equipment that increases the load as it senses that the muscle contraction is speeding up.
Isometric Contraction
An application of force to a muscle in which the joint angle and muscle length do not change during contraction.
Isotonic Contraction
A contraction of the muscle in which tension remains unchanged and the muscle’s length changes. Ex. Lifting an object at a constant rate of speed.
Relative Strength
The maximum force exerted in relation to body weight or muscle size.
Reading Programming
Reading the Program
Tempos, reps, sets, etc.
Tempo
The purpose of tempo training is typically to increase the time under tension to effect strength, but there are a lot of other reasons for tempo training:
1. Improved body awareness
2. Improved control of lifts.
3. Development of connective tissue strength.
4. Improved stability.
5. Focus on muscular elements versus tendinous elements (a slow, controlled motion is going to place more stress on the muscles, whereas a bouncy or ballistic motion will place more stress on the tendons, etc.).
Reading the tempo
30×1
3 – The first number is the eccentric part of the movement
0 – The second number denotes any pause at midpoint
x – The ‘x’ is always the concentric or lifting part of the movement
1 – The last number denotes any pause at the top
Reading tempo’s are fairly easy for things like squats and pushups, because the initiation of the movement is the eccentric part and therefore the beginning of the movement and first number of the tempo.
Things get a little more challenging to read when you have things like deadlifts and pull-ups where the first part of the movement is the concentric part of the movement. When following the same tempo for a pull-up – 30×1 it will follow this format if starting from the beginning of the movement:
x – The concentric part of the movement is from hanging to pulling the chin up over the bar.
1 – The pause at the top is the hold with the chin over the bar
3 – The eccentric part is the lowering back to hanging
0 – The last number shows how many seconds in the hang before completing the next rep
Time Under Tension
Time under tension is critical for maximal strength development because training at the lower speeds create more metabolic adaptations. There are parameters to the length of time under tension
1. For relative strength the time under tension should not exceed 20 seconds.
2. For absolute strength the time under tension should not exceed 40 seconds.
Reps
Different rep ranges are required for each desired strength and training adaptation.
1-5 Reps
– Maximal Strength: Lifting as much weight as possible for 1-5 reps
– Speed & Power: Lifting a sub maximal weight with the highest speed possible
4-8 Reps
– Absolute Strength:
8-12 Reps
– Hypertrophy: Lifting a light to moderate load creating an extended time under tension
12+ Reps
– Strength Endurance: The ability to produce force for time
Sets
The sets play a key role in creating the desired training adaptations as well as keeping the athlete safe in training. After understanding the goal and rep ranges, it is important to keep the athlete in the desired training modality through setting the sets.
Sets in weight training protocols:
1. Multiple sets lead to higher and faster rates of gains (multiple exposures)
2. The number of sets is inversely proportional to TUT per set (high TUT – low sets; low TUT – high sets)
3. A large number of sets gets a more favorable anabolic response
4. Multiple sets increase with training age
5. Multiple Sets leads to an increased rate and magnitude of strength/power gains
6. Overtraining/Overreaching? Make sure to decrease sets 1st, not intensity
LIV Programs
LIV Programs
Goals

Goal – character first
Periodized – No
Program Format Skill based on accumulating stars (Skills)
Program and Character lecture are a 1 month focus

Sweat Goal – Fat Loss, improved speed, balance, coordination, strength, stamina
Periodized – No
Program Format Weekly Testers (every 12 weeks)
Format:
– Part A: Functional Strength
– Part B: Aerobic Training

Health
Goal: Longevity, build on Sweat foundation, improved skill Introduced to Barbells and other higher skill movements
Periodized – No
Program Format 6-9 week cycles
Performance
Goal: Sport, build on Heath, higher skill, higher intensity, increased load
Periodized – Yes: around the Open
Program Format 6-9 week cycles based on peaking / training for the CrossFit Open
The Process
The Process
The triple check system
Phase 1 Macro Planning
Set up the framework for each program based on goals and periodization.
For example:
The performance program is periodized around the CrossFit Open so the programmer will plan the building process to from one Open season to the next. The cycles may look something like this:
Open 2018
Strength
Strength Stamina/Endurance
MAP – Maximal Aerobic Power
Lactate
Mini Strength Cycle
MAP
Open 2019
Whereas the Sweat program is a year round program that needs to consider atheltes of all levels and training age. Their training program will have a base of conditioning with added focuses throughout the year. The cycle may look something like this:
1 mile run & Pullup Strength
2K row & Pushup Strength
Jump Rope & Stabilit
Phase 2 Macro Planning
Phase 2 of the Macro planning is the building of individual cycles. Once the goal or the program, the time of year/cycle is established it is time to create the plan of the actual cycle. This will be the blueprint for creating the day to day workouts.
Here is an example of a Health cycle:
Monday
A. Back Squat (Relative Strength)
B. Long Metcon
Tuesday
A. Kipping
B. EMOM
Wednesday
A. Deadlifts
B. Interval Sprints (Crossfit Movements)
Thursday
A.Push Press
B. Rowing Intervals
Friday
A. Power Snatch +OHS
B. 8-12 Minutes
Saturday
A. Tag Team
Sunday
A. Endurance Based
B. Post WOD Bodybuilding
Micro Planning
After the cycle is built, the programming team will develop the weekly workout. This happens about 2 weeks in advance each week so we can make changes based on what is happening in class and how athletes are adapting to the intended programming.
Without going into a full week, here is an example on how the programming is built from the cycle planning.
Monday Goals
A. Back Squat (Relative Strength)
B. Long Metcon
Week 1
Every 3 Minutes for 12 Minutes:
A1. Back Squat 8 Reps @ 65-70%
A2. 15 Banded Terminal Knee Extensions (Per Side)
16 Minute AMRAP:
400m Run
30 Russian Twists
20 Walking Lunges
10 Sprawls
Week 2
Every 3 Minutes for 12 Minutes:
A1. Back Squat 6 Reps @ 72-77%
A2. 15-20 Banded Terminal Knee Extensions
16 Minute AMRAP:
10 Slam Balls
20 Walking Lunges (Bear Hug Meball)
30 Medball Push Passes
400m Medball Run
Week 3
Every 3 Minutes for 12 Minutes:
A1. Back Squat 5 Reps @ 78-83%
A2. 15 Banded Side Steps Per Side
For Time:
600m Run
30 Box Jumps
30 Wallballs
30 Rotational Slam Balls
400m Run
20 Box Jumps
20 Wall Balls
20 Rotational Slam Balls
200m Run
10 Box Jumps
10 Wallballs
10 Rotationals Slam Balls
You will notice how the back squat and workout progress throughout the cycle.
Review Process
After the programming team is done creating the workouts for the upcoming week they send it to another team member to review the program with a fresh set of eyes. The review team is responsible for looking for the following:
1. Overload or Over programming
Is there hinging 3 days in a row?
What about too many complex movements in one day?
Some movements are tricky where they are not inherently what they seem to be. For example, rowing may seem like a metabolic piece, but when coupled with KB Swings, Medball Slams, Deadlifts, etc it can place overload on hinging and put the athlete at risk for injury.
The same goes for over programming. As coaches, you want to have the opportunity to coach versus instruct athletes on higher skill movements. The review team is responsible for making sure there is appropriate time to teach or focus on those movements.
2. Equipment Needs
When reviewing programming we base everything off of having 20 people in class. Since we do not have 20 of most pieces of equipment, we have to make sure the workout is programmed in such a way to share equipment efficiently.
The usability of the equipment is also a factor. Having wallballs, pull-ups, and rope climbs in a workout would not workout well as they all use the same space on the gym floor.
3. Balance
Does the workout follow the program and cycle goals?
Are there any movements or modalities that have been omitted?
Are we doing wallballs 2 times in a week where it could be changed to another similar movement like thrusters?
4. Fun Factor
At the end of the day, we want this to be the best hour of their day so there has to be some fun factor involved. Many times that comes in the form of workout format.
Data Input & Second Review
The final step is inputting the workouts in Zen Planner. This is done by another fresh pair of eyes to offer one last look at the program before it is seen by the athletes